From Reference Manager to Reference Maps
Overwhelmed with your research library, and papers on the to-read list? Here is a solution to revolutionise the way you organise your library. Mind map meets Zotero.
My Blog has moved
If you want to receive updates, new content, and tips, check out my website.
Recently I switched from a “Database” to a “MindMap” for collecting my academic literature. The resulting “Reference Maps” are a game changer when it comes to connecting, understanding, and organising your research literature. Here is how it looks.
Most people use Zotero or Mendeley to “accumulate” their literature. I never felt they deserved the title of a Reference _Manager_, since they never managed anything. It was marginally a step up from that pile of papers in some folder on your hard drive.
Besides, Zotero maximised highlights I made inside PDFs, but minimised the notes I was writing to understand the subject matter. In consequence, I remember less, as I connect less, and I can’t even find my notes.
Reference Maps changed all of that for me and they play so nicely with my system of “Source - Collections - Thoughts - Outlines” (see details here).
Maybe you can see the potential from this small gif already? But for me, the main points are:
My Reference manager follows my thinking. Papers related to one another, are close together spatially.
I start thinking “spatially”. When I think “This paper on XYZ… where was it again?” the next thought is “Must be somewhere on the top right with my other forest ecology papers”.
I see my own summaries of each paper and even see the original PDF (with annotations) when I hover over the papers.
I can have multiple reference maps or have the same paper in multiple locations, without duplicating anything. Quite useful once your collection grows and you want to make sense of it in a “new way”.
And yes I can still display everything as a table, like in Zotero and generate citations for a publication. More on that later.
If you learn by example, feel free to just download the vault with an example here.
I built the entire workflow using Obsidian’s new Canvas feature. It’s not complicated - but you have to store your notes in a certain way, to use all features.
Let’s go into the details.
Prepare your source notes to work well
Not surprisingly it is built with Obsidian. All you need, is to stick to a methodology of how you take notes. Nothing more. With a few small tweaks, it can be as easy as adding something to Zotero.
I downloaded the PDF into my Obsidian vault.
For each paper I create a single note that I call a “Source Note” (e.g. “Smith 2019”). It will contain my thoughts on the paper.
The first element all source notes have is a set of fields at the top called “frontmatter”. This information is normally hidden but I can use it to build lists of papers and create pretty citations.
The second element is a title that I link to the PDF. This allows you to hover over the note and have the PDF pop up - extremely handy and I recommend not to skip it.
I use a template to create note stubs in exactly that format so I don’t think about it.
You can include summaries, titles, etc. But these are inessential to for the visual reference manager.
If you want to generate publishable citations later, you MUST include a DOI in your frontmatter. DOI stands for “Digital Object Identifier” and is an ID that every paper has, if it has been uploaded to a journal or even arxiv. We will generate citations from DOIs automatically (later in article).
You can find templates and examples in my example vault.
Let’s create a graph!
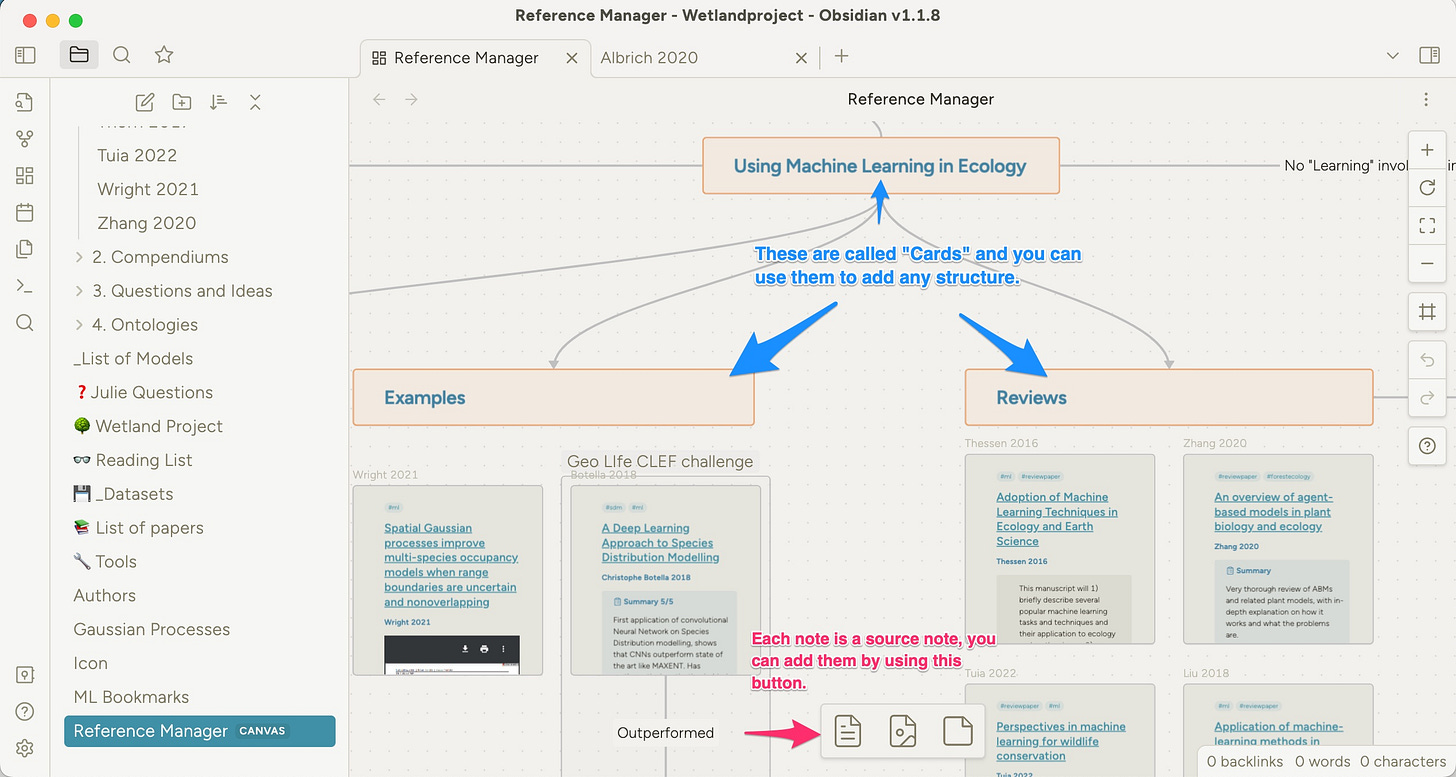
Obsidian recently introduced the Canvas feature. Which is an infinite whiteboard that you can drag your notes onto, connect them with arrows, and include some texts and styles. I absolutely love how simple it is.
The visual reference manager makes use of that, to help you structure your literature in an organic way. Your brain is not a database after all.
Here for example is a small section of a graph in my research:
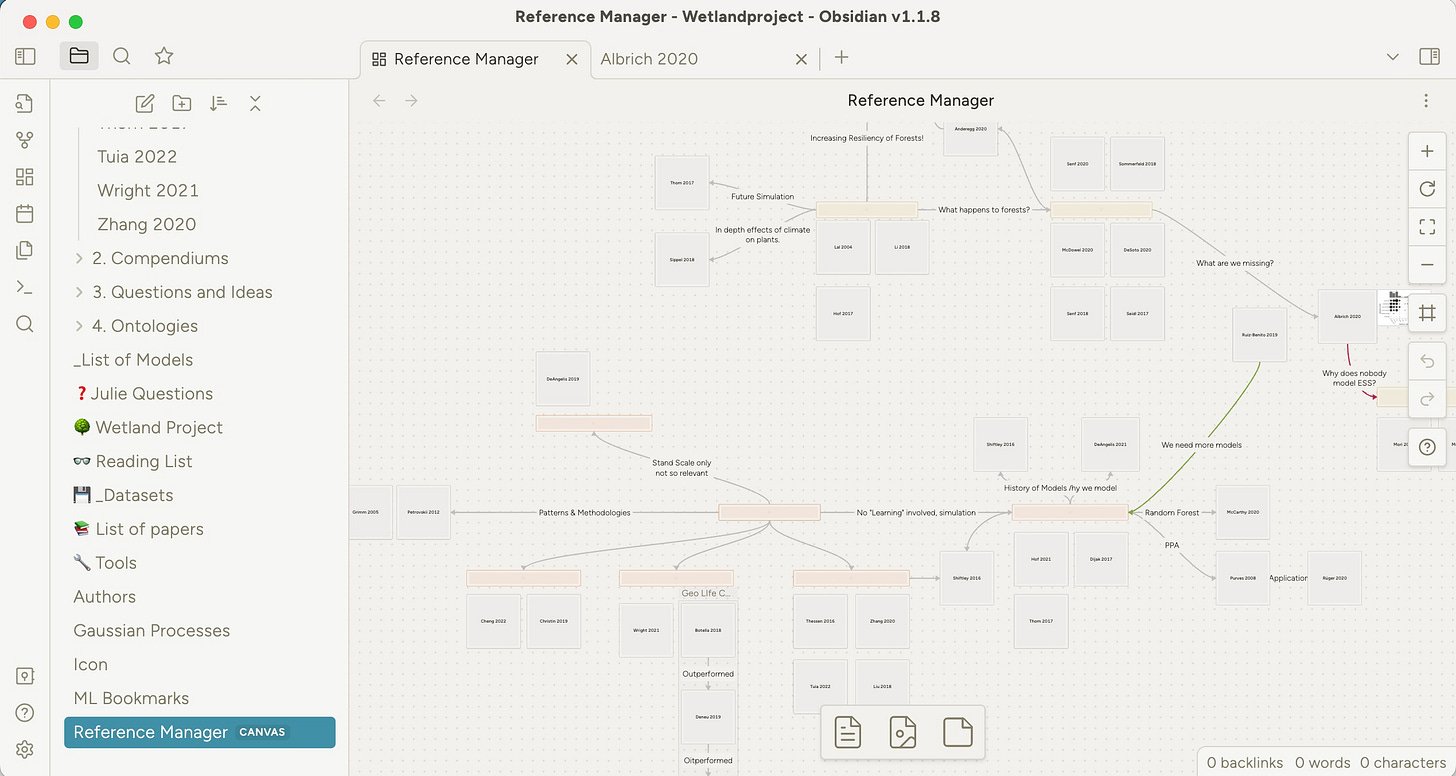
If you zoom out a little bit, you get an overview of how powerful and diverse your reference manager now becomes!
Note also that I can hover over the title of the paper to immediately get a preview of the PDF (That is why we linked the PDF to the title of the note in the previous step)...
…and even edit it directly in my reference manager. My notes are now merged into one with the reference manager. How cool is that!?
It is essentially a mind map of all your papers organised by however it makes sense to you. Of course, you can create many of those reference maps. Each maybe catering to a certain needs. Also, you can add the same paper multiple times if it makes sense.
Be creative!
While it may be daunting to build the graph initially, later on as you add papers you already know where to drop them and it becomes absolutely natural and fun.
You also gain a feeling of working “somewhere in the graph”. The bottom left for example is my machine learning literature, the top is climate change and the right is general forest ecology.
You will even remember where (in 2D spatially) to look if someone asks you for a paper or you want to look something up.
Lists of References
Sometimes you will still want to see a list of references to share it, create citations, etc. That’s simple too!
Because our source notes are separate from the Canvas, we can use them in this more classical fashion as well.
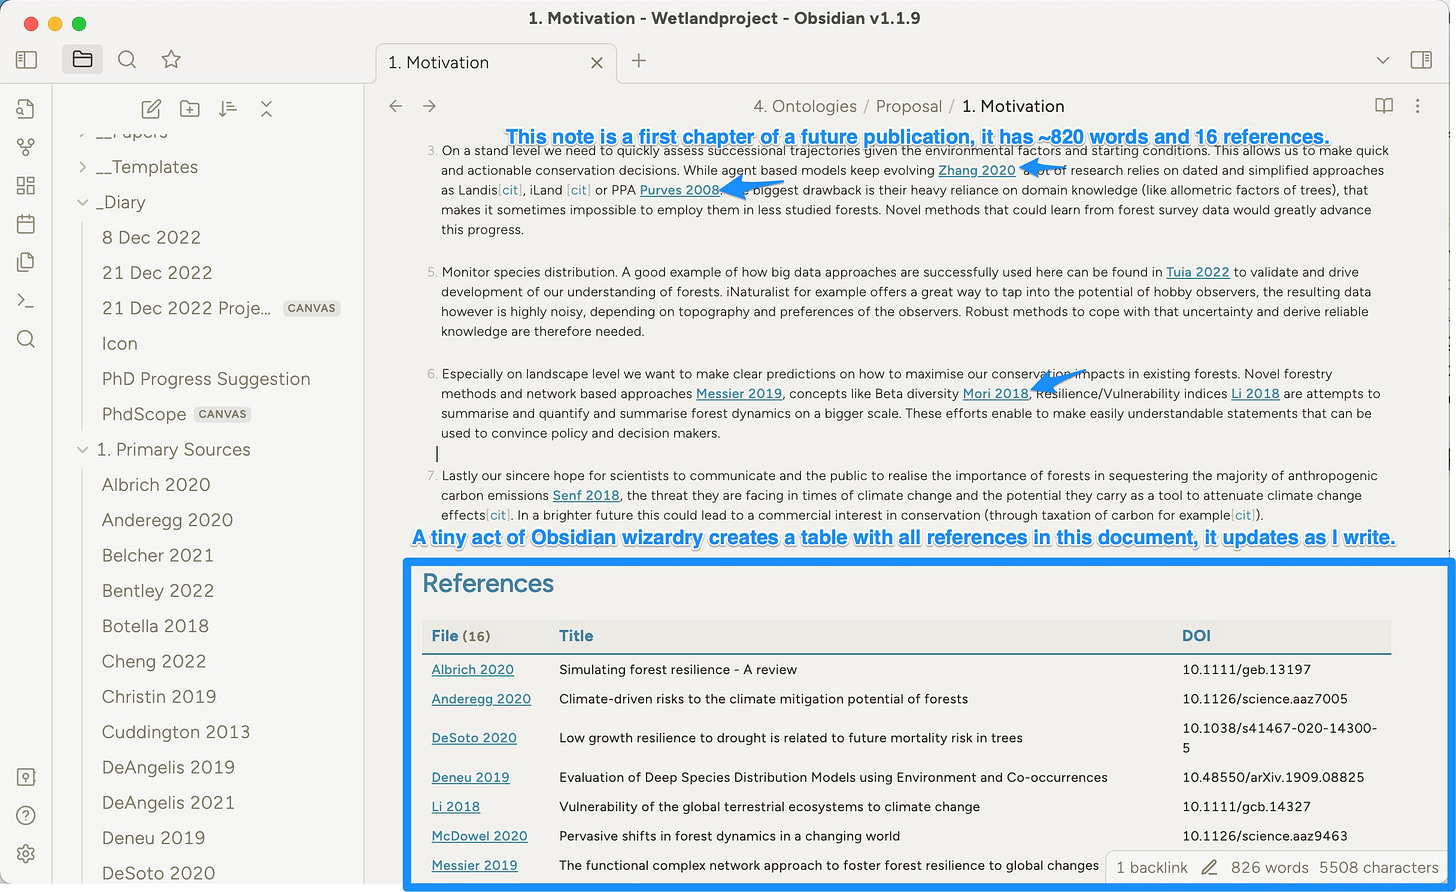
The best thing we are flexible about what goes into the list. My favourite feature is that I can write a note with links to papers in Obsidian and generate a list of references that I used in this note! Super powerful. It replaces Zotero + MS Word plugin for me. I call these notes “Outline notes”.
Here is how to do it.
We will need the Dataview plugin. Installing a community plugin is super simple. Go to Settings > Community Plugins > Click “Browse” and look for “Dataview”.
Dataview allows you to insert a small piece of code, that will search & filter through your notes and then display them as a table. I won’t lie to you though, it is not easy to use. Luckily you only have to set it up once - and there is plenty of help online.
I prepared a few scripts for you that you can just download and use, in my demo vault. It includes the example of “References from Note” above. I strongly recommend you take a look at it as we go along with the explanation.
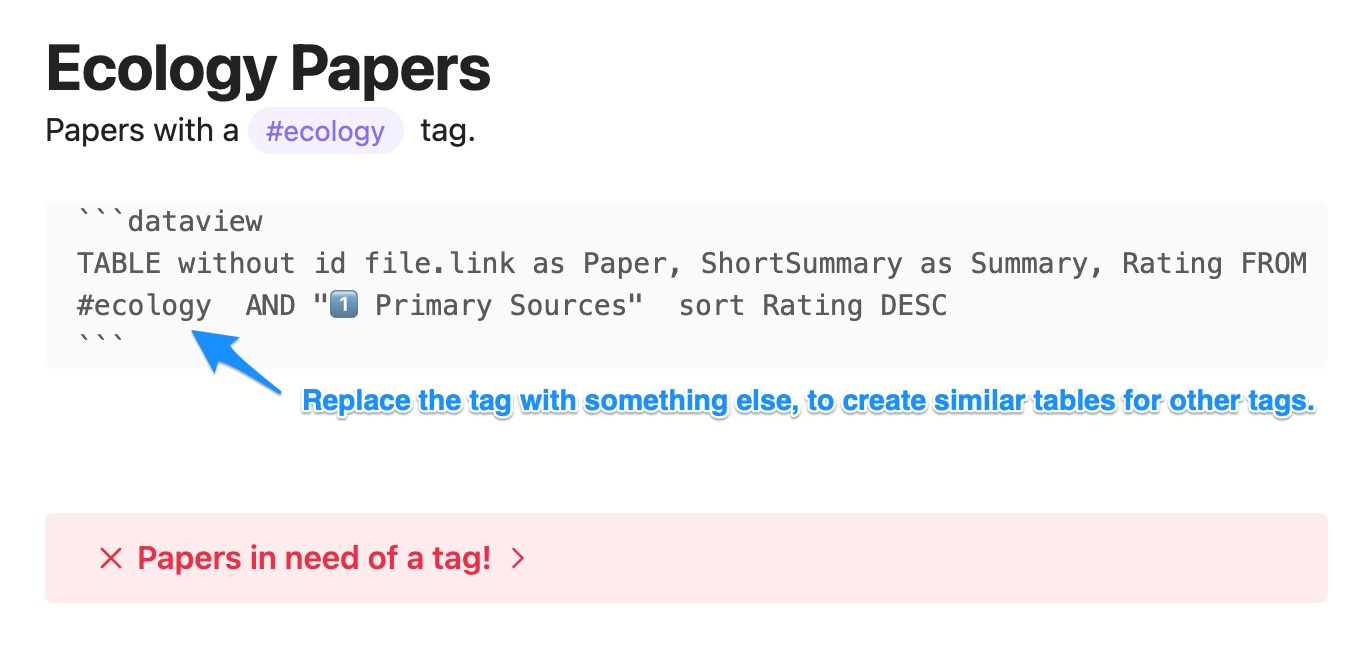
In the demo vault check out the “List of Papers” note, to see some examples on creating different tables which display either all papers, or papers having a certain tag.
If you remember at the beginning, we added some machine-readable information to each source note, called “frontmatter”. This frontmatter is what appears here as columns now.
When you click on the table, it will switch to the code that generates it. Explaining how to use “DataView” is a bit beyond the scope of this article. But feel free to comment below, if you have specific requirements or just shout out to me on Twitter. I promise to answer!
Here is an example for the most common use case. In the above example, you have a table that displays all “#reviewpapers”. Now we added an “#ecology” tag for papers. Copy paste the code for #reviewpapers and replace “#reviewpapers” with “#ecology”.
Not too bad, is it?
As you might have guessed, you can create any sorts of combinations of tags, folders, sort by different properties and customise the tables however you want. Dataview is very flexible, but unfortunately a bit hard to use. A good alternative can be the Datafolders plugin.
How to create a list of citations
Before you can publish you would need to generate citations in APA, MLA, Chicago, Harvard or any other format. We can do that from the DOIs (identifiers that each paper has) and paste them into the Bibtex converter. I have a Twitter thread with videos, if you prefer…
…Or keep reading!
In the previous example I mentioned “Outline notes”, or notes where I write a piece of scientific writing in my own words and insert obsidian links to the papers above. (Learn more about my system of academic note taking.)
This is how it looks:
The code you need is for this table:
```dataview
TABLE without id DOI FROM outgoing([[]]) AND "1️⃣ Primary Sources"
```
Copy paste it as is into the obsidian note. Mind the number of ` and that there is a linebreak after: ```dataview
“without id” can be added or removed to hide or display the “Note” column, in the image above.
The table above will give you the DOIs that you copy paste into bibtex to generate citations, a bibtex file that you can use for any other scientific app (like litmaps) and so on.
I will leave the explanation here. This Twitter thread has videos to give you more detail of how this works - if you even need this feature.
Generating final citations is something I tend to do at the very end of publishing. This tutorial is more about the visual reference manager and to show that yes you can still do the things you would normally do with Zotero or Mendeley.
I also strongly believe that with the community developing someone will make a simple plugin to generate bibtex and reference lists, making this whole workflow obsolete and utterly convenient at some point in the future.
Summary
Here I presented to you a new system of keeping track of your academic references by organising them in a graph and enriching with labels and connections.
This helps your thinking since you can use spatial cues to remember the location and topic of a publication.
To see an example, download the vault and play around with it.
Please help
As I start out building this newsletter and Twitter following, I realise how insanely labour-intensive and luck-driven it is. So I’ll ask you for help : )
Making some statistical calculations led me to the conclusion that no matter the quality of my tweets and content, the chances of reaching a new audience and growing it organically are very low (or slow). Only after my tweets start reaching 500-1000 impressions is the probability of reaching a first retweet and thus budding organic growth slowly climbing towards ~90%.
If you like the ideas expressed here, please help me skew this distribution by sharing it with your folks on Twitter or via email.
Lastly, if you help me I help you : ) Any comments, feedback, or questions are welcome in the comment section below.


